- WinWedge is for collecting data from serial devices— RS232 or RS232-to-USB scales, balances, meters, gauges and many more device—directly into any Windows application, spreadsheet, document, or web form. For data collection from devices over a network connection (Ethernet or TCP/IP), please see the TCP-Wedge Quick Start Guide.
- This guide is a basic outline of the most common setup flow for most WinWedge users.
- For more detailed information and features, see the full manual or our support pages.
- You can download this guide as a PDF. We also have a video demonstration of WinWedge that covers many of the steps in this guide.
Contents:
1. Setup the connection to your device
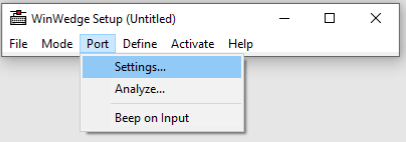
Go to “Port” > “Settings” from the WinWedge main menu.
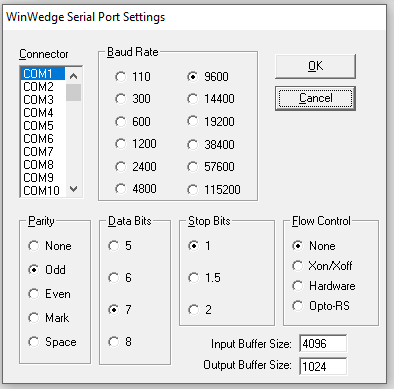
To communicate properly, the settings in WinWedge must match the way your serial device sends data (Baud rate, Parity, Data Bits, Stop Bits, and Flow Control). These settings should be outlined in your device’s manual or in your device’s menu system, if your device is configurable.
WinWedge also needs to locate your device by its Windows-assigned COM port number, under Connector. You can confirm your device or adapter’s COM number by using the Windows Device Manager:
- Right-click on the Windows Start Button and select “Device Manager.”
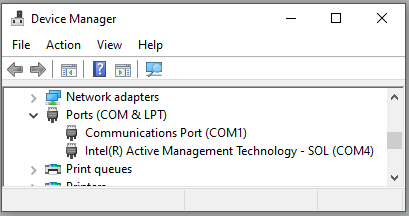
- Click on the arrow next to “Ports (COM & LPT)” to see a list of all available COM ports. Your RS232 device should appear here with its port number labeled “(COM#).”
- If your device does not appear here or if you need more information on using the Device Manager, please see Identify your device’s COM port with Device Manager for more details.
- If you see a COM Port listed as “Intel(R) Active Management Technology -SOL (COMn)”, this is not an actual RS232 COM Port and should be ignored when configuring WinWedge.
2. See how the raw data looks and test commands
You’ll need to verify that WinWedge can see the data from your device and identify anything you might want to filter or separate when you transmit to your target app.
Go to “Port” > “Analyze” from the WinWedge main menu, then have your device transmit a reading.
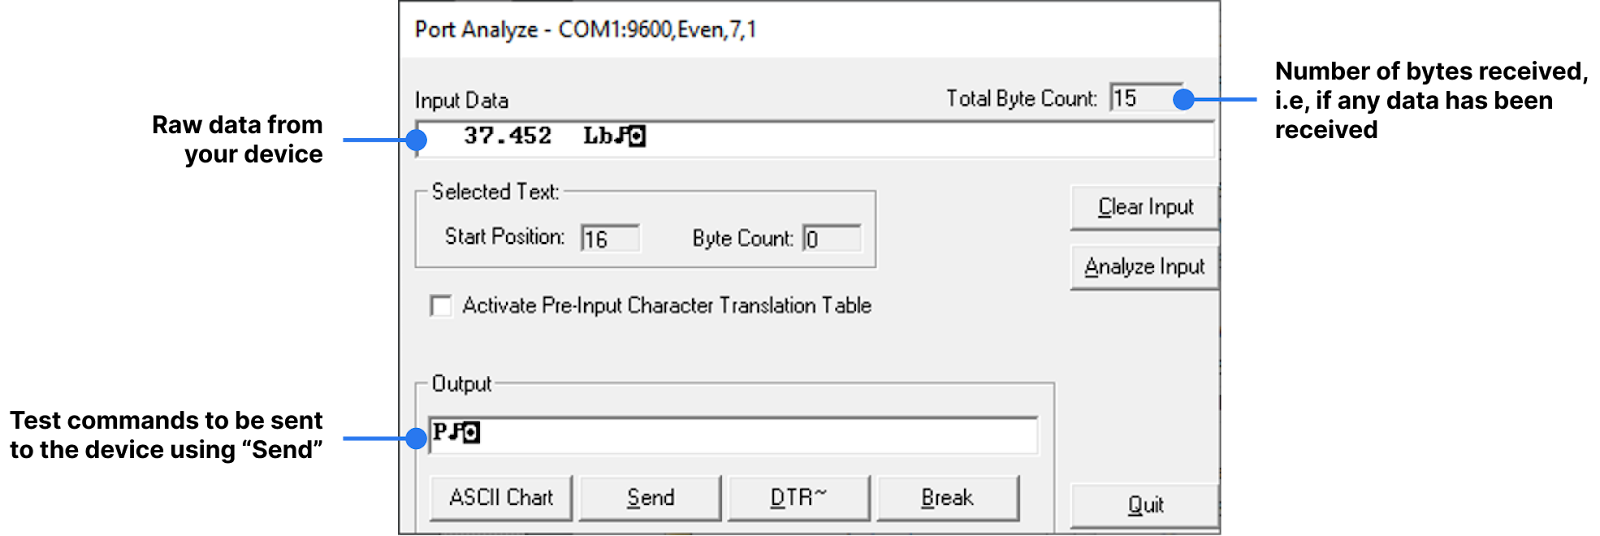
Understanding your device’s raw data
Once you have readable data in the Input Data textbox, you’ll want to remember how it’s structured so you can customize it later.
Notice patterns:
- Starting and ending characters
- Any separators (aka “delimiters”) for different kinds of data, such as commas or spaces
- What parts you want to keep / discard
- If the data consists of fixed-length fields, you can select these fields in the Input Data textbox to see the length of each.
You will need this for Step 4.
Common troubleshooting
If no data appears and “Total Byte Count” is 0:
- The device may not be sending data.
- Make sure the device is turned on and connected, then try pressing the “Print” or “Transmit” button on your device.
- If there is no Print or Transmit button, you may need to send a command from WinWedge to the device to request data. Check the device manual for a “Print” or “Transmit” command you can enter & send in the Output box.
- Use the “ASCII Chart” button to include special characters in your command (e.g., carriage returns or control codes). Common special characters include a music note (meaning Carriage Return, ASCII 13) or a box with a circle (meaning Linefeed, ASCII 10).
- The data might not be reaching WinWedge. Make sure the device or adapter is connected to the COM port that you selected in Port Settings in Step 1.
- Most scales, balances and other common RS232 devices need a null-modem adaptor or null-modem cable to connect to a PC.
If you receive unreadable data, or byte count shows invisible data
This indicates that the device is sending data to the selected COM port, but one or more settings in the Port Settings window from Step 1 is incorrect.
- To find your device’s RS232 communication settings, check its manual, contact the manufacturer, or ask an AI tool (e.g., ChatGPT, Claude, Gemini) for common configurations to try for your device.
- If you receive the correct number of characters but some are unreadable (e.g., symbols or gibberish): The Baud rate is correct, but the Parity and/or Data Bits setting in WinWedge does not match your device.
- If all received characters are unreadable: The Baud rate setting in COM port settings is incorrect.
3. Choose the method for how WinWedge sends data
The mode determines how WinWedge sends data to Excel or any other Windows application.

- “Send Keystrokes To…” sends data by simulating keystrokes, acting as if someone were manually typing the data. This guide will proceed with this option, assuming a simple setup.
- The more advanced “DDE Server…” option uses Window’s Dynamic Data Exchange feature to send data within the operating system. See our DDE Server Mode Setup Guide for more info.
- (Pro version only) “Log to disk…” sends data directly to a text file with a .log file extension.
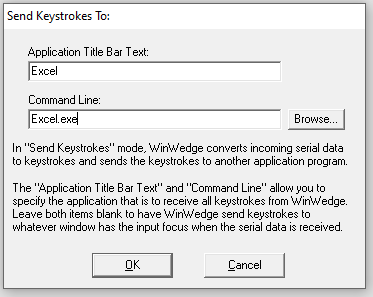
- If you want your scale or device data to appear at the cursor location within any open application, leave the “Application Title Bar Text” and “Command Line” fields blank.
- If you want WinWedge to automatically launch an application before sending data to it, fill these fields with the name of your application and its executable file, respectively (i.e., “EXCEL” and “EXCEL.exe”).
- The default “1 ms” works for most situations.
- Click “OK” to save and dismiss this window.
4. Define the data structure
Now you need to setup the workflow WinWedge uses to send data.
IMPORTANT: To configure this, you’ll need to know how the raw, unformatted data appears. Make sure you’ve completed step 2 before proceeding.
Go to “Define” > “Input Data Record Structure…” to configure how WinWedge formats and sends the data to your target application.
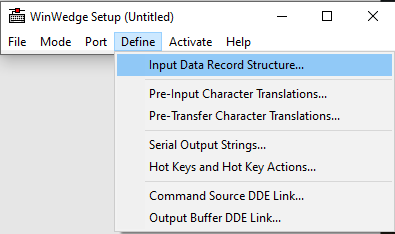
This starts a step-by-step wizard where you define what happens when WinWedge sees data from your device. If you’re using a scale, balance, or gauge to send a single field of data, your setup will likely look similar to the screenshots below.
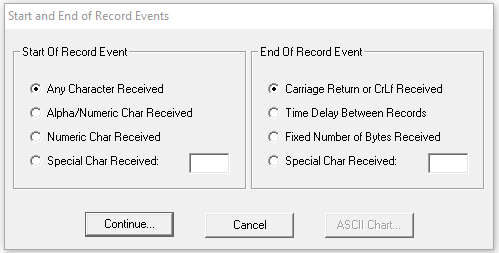
- First, defining the Start and End of Record Events tells WinWedge when to start/stop paying attention to an incoming data transmission.
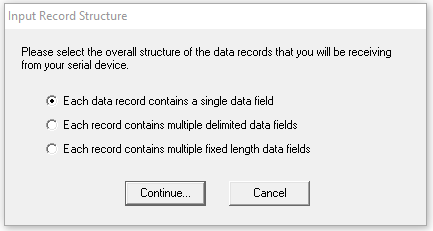
- Next, tell WinWedge whether or not to split up the data into fields. Separating into fields allows you to handle each field differently, such as entering them in different places or with different keystrokes.
- Leave it as “…single data field” if you have no need to split up the data.
- Choose “…multiple delimited data fields” if there’s a consistent character separating the fields. For instance, if the record is “123 oz,” you could say that the record is 2 fields with a space delimiter (or you could leave the weight and unit as “single field data” if you have no need to separate them).
- Choose “…multiple fixed length data fields” if each field is always the same length and you don’t need to use a separator character to distinguish them.
- Next, the Input Record Definition Editor lets you define what happens to each field. If you separated a record like “123 oz” into two fields in the previous step, then the options for Field 1 would apply to “123,” and you would click “Next field” to configure Field 2 (“oz”).
- “Preamble/Postamble Keystrokes” let you “type” extra keystrokes before/after the data that WinWedge sends to your target application. Each field can have its own postamble keystrokes. You might use this to move around a form or press ‘Enter’ after WinWedge sends the last field in your data.
- To move to the next spreadsheet cell, you might put
<TAB>in “Field postamble keystrokes.” - To include a custom label before this entire record, you would write that in “Record preamble keystrokes.” Use “Postamble keystrokes” for per-field labels.
- To move to the next spreadsheet cell, you might put
- “Input Filter” lets you filter the field to only the parts you care about. Most users select “None,” “Ignore this field,” or “Numeric Data Only.”
- You can learn more about the Format and Math Expressions available in WinWedge Professional Edition the WinWedge User’s Manual.
- If you are using DDE mode with WinWedge Professional Edition, you will be prompted to enter a DDE command instead. You can learn more about using the DDE mode in our DDE Server Mode Setup Guide.
- “Preamble/Postamble Keystrokes” let you “type” extra keystrokes before/after the data that WinWedge sends to your target application. Each field can have its own postamble keystrokes. You might use this to move around a form or press ‘Enter’ after WinWedge sends the last field in your data.

For more information on interpreting your device data, visit this article.
Optional: Define Output Strings

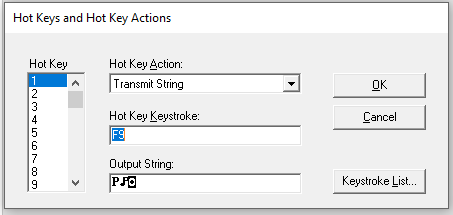
Some devices require a serial command to send data (e.g., pressing “Print” on a scale). If you know your device’s serial commands, you can set up WinWedge to send these commands in “Define” > “Serial Output Strings…” and in “Define” > “Hotkeys and …”. Options include “clicking” a button, mapping keyboard shortcuts (hotkeys) to serial commands, and automatically sending a command to your device on a timed interval.
5. Start the workflow for sending data
The final step is to activate WinWedge and start logging device data using the settings you configured.
- Important: Go to “File” > “Save” and save the configuration file you have just created.
- Go to “Activate” > “Test Mode”. Test Mode automatically reopens the WinWedge Setup window after deactivating, allowing you to quickly make any adjustments to your configuration. After finalizing your settings, you should use Normal mode.
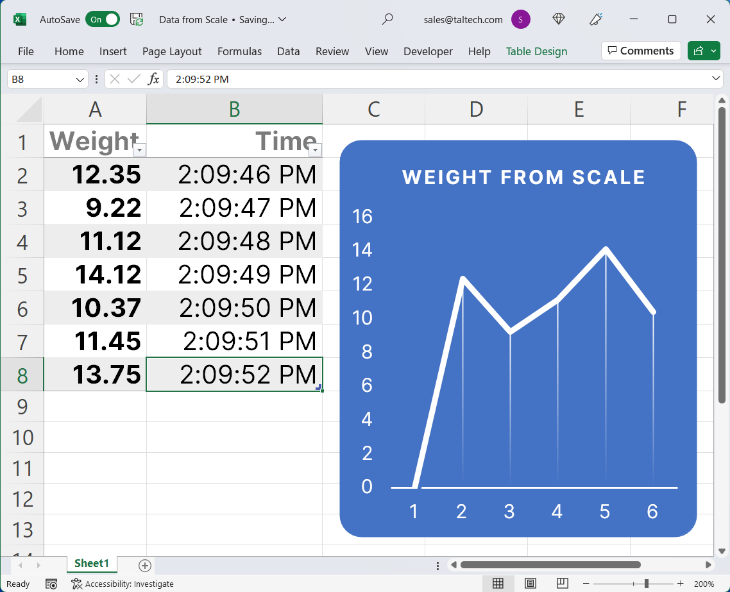
- Open Excel or any Windows application and the real-time scale or device data will “pop in” at the cursor.
Trial versions of WinWedge or TCP-Wedge will only stay active for 20 minutes (in Test or Normal mode). After that, you will have to restart the software. In addition, the About window will always remain open.
If something doesn’t look right or if you aren’t getting data, double check these steps. If you need more help, contact support@taltech.com or call +1 215-496-0222 during EST business hours.